
🔨 Environments for Manual Installation
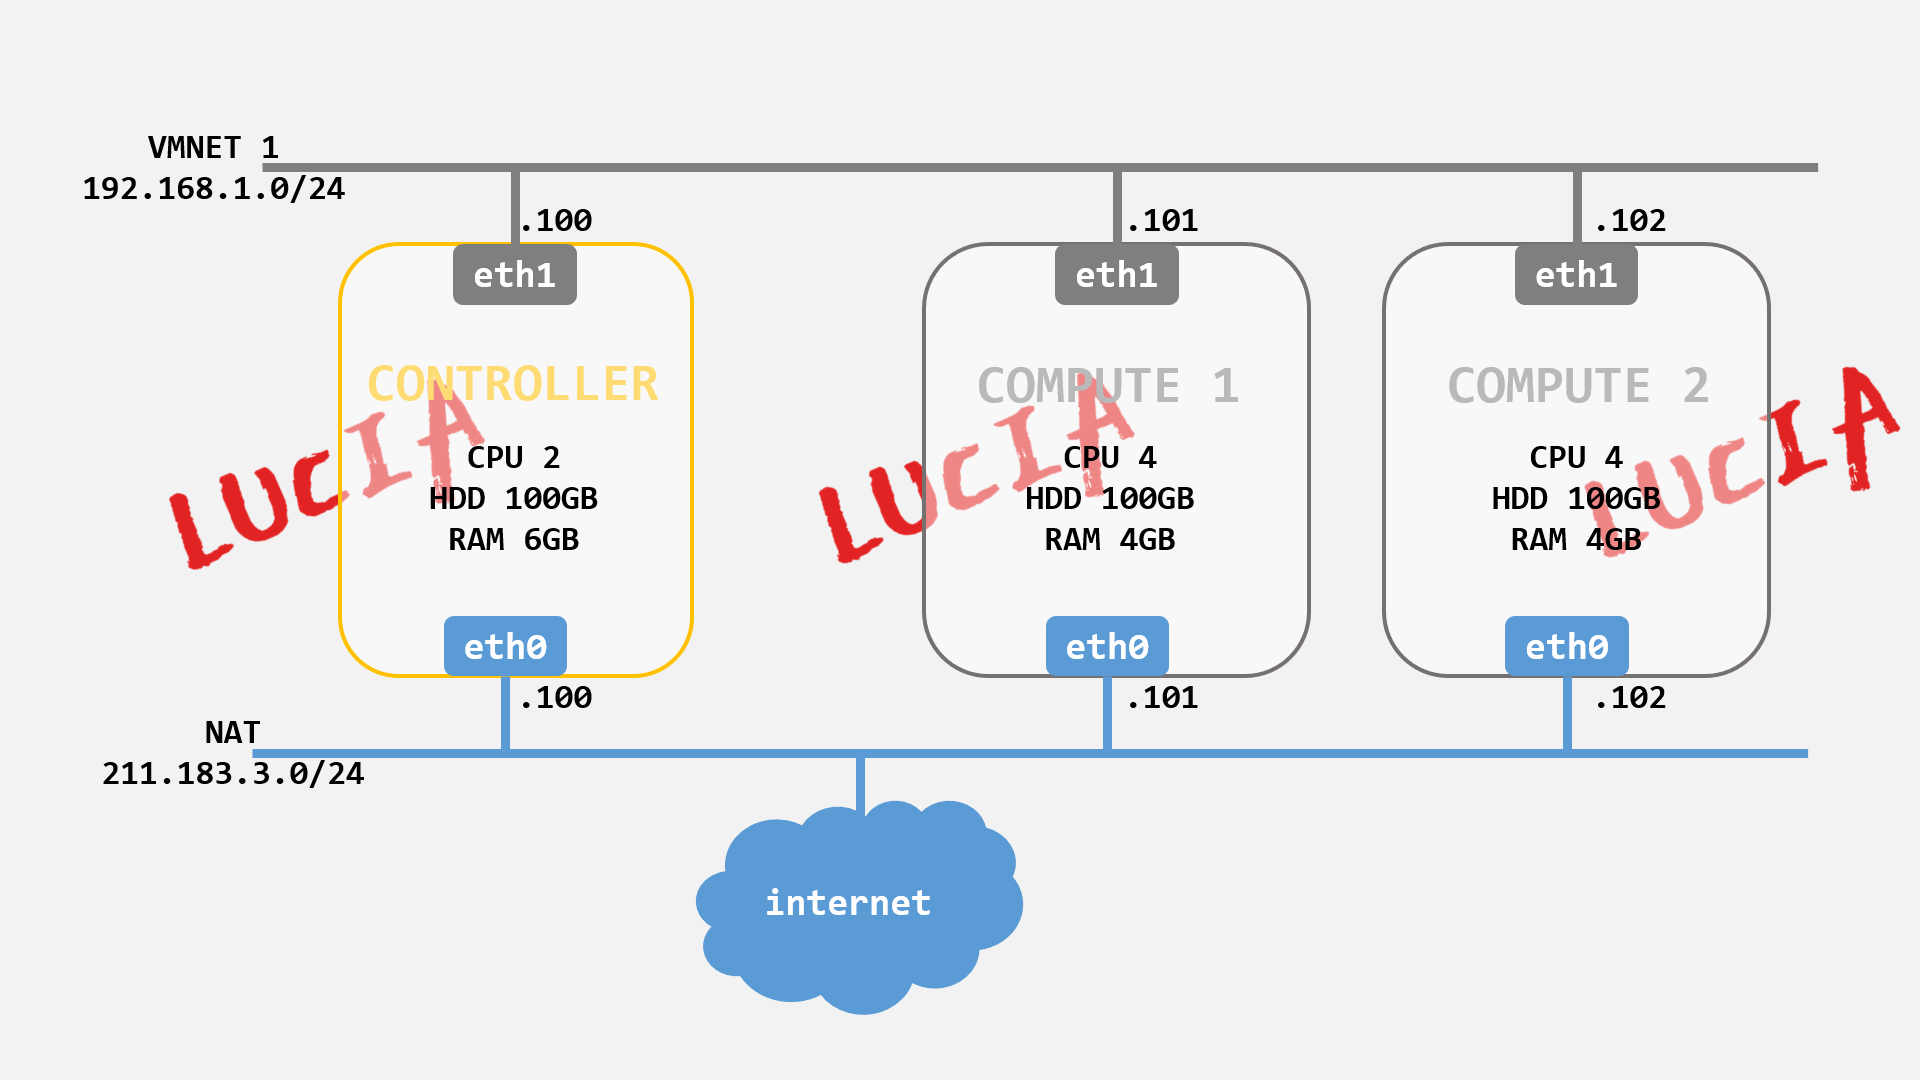
[ 노드 구성표 ]
🔨 네트워크 타임 서비스 설치 @All Nodes
네트워크타임서비스의 필요성:
controller node와 compute node 간의 시간이 일치해야 compute node에서
특정시간에 생성한 인스턴스를 동일한 시간을 가지는 controller node에서 찾기 가능
🟢 Chrony 패키지 설치 @ All Nodes(Controller Node와 Compute Node)
# yum -y install chrony
Total download size: 307 k
Installed size: 788 k
Downloading packages:
(1/2): libseccomp-2.3.1-4.el7.x86_64.rpm                   |  56 kB   00:00
(2/2): chrony-3.4-1.el7.x86_64.rpm                         | 251 kB   00:00
--------------------------------------------------------------------------------
Total                                              1.3 MB/s | 307 kB  00:00
🟢 Chrony 설정 변경 @ Controller Node
# vi /etc/chrony.conf
server 0.pool.ntp.org iburst
server 1.pool.ntp.org iburst
server 2.pool.ntp.org iburst
server 3.pool.ntp.org iburst
....
# Allow NTP client access from local network.
allow 0/0
🟢 Chrony 설정 변경 @ Compute Node
# vi /etc/chrony.conf
server 192.168.1.100[컨트롤러 노드의 관리용 IP] iburst
🟢 Chronyd.service 서비스 시작 및 활성화 @ All Nodes
# systemctl enable chronyd.service
# systemctl start chronyd.service
# systemctl status chronyd.service
⚫ Verification: Chrony에서 설정한 NTP 서버 목록 확인 @ All Nodes
# chronyc sources
210 Number of sources = 4
MS Name/IP address         Stratum Poll Reach LastRx Last sample
===============================================================================
^+ ntp1.ds.network               4   6    17    37   -921us[-1424us] +/-   79ms
^* 1-34-13-89.HINET-IP.hine>     2   6    17    36   +799us[ +285us] +/-   40ms
^- ec2-13-55-50-68.ap-south>     3   6    17    37   +899us[ +422us] +/-  155ms
^+ dadns.cdnetworks.co.kr        2   6    17    37   -798us[-1282us] +/-   69ms
210 Number of sources = 1
MS Name/IP address         Stratum Poll Reach LastRx Last sample
===============================================================================
^* control                       3   6    17    10    -25us[-1024us] +/-   39ms
[ compute노드에서는 controller노드만 나오면 정상 적용]
🔨 Openstack 패키지 설치 @ All Nodes
# yum -y install centos-release-openstack-rocky
# yum -y upgrade
# reboot
🟢 python-openstackclinet설치:
오픈스택 클라이언트란 오픈스택을 위한 CLI라고 할 수 있는데 오픈스택의 다양한 서비스 API에 대한 명령어를 단일한 쉘(shell)에 동일한 명령어 구조로 넣어 전달한다.
# yum -y install python-openstackclient
🟢 openstack-selinux 설치:
오픈스택 서비스에서 보안정책을 자동 관리한다.
# yum -y install openstack-selinux
🔨 SQL 데이터베이스 설치 @ Controller Node
: 오픈스택의 Metadata를 저장하고 관리
# yum -y install mariadb mariadb-server python2-PyMySQL
🟢 /etc/my.cnf.d/openstack.cnf 생성과 동시에 파일 내용 수정
# vi /my.cnf.d/openstack.cnf
---------------------------------------
[mysqld]
bind-address = 192.168.1.100[컨트롤러 노드의 관리용 IP]
default-storage-engine = innodb
innodb_file_per_table = on
max_connections = 4096
collation-server = utf8_general_ci
character-set-server = utf8
🟢 데이터 베이스 서비스 실행 및 활성화
# systemctl enable mariadb.service
# systemctl start mariadb.service
# systemctl status mariadb.service
🟢 데이터 베이스 서비스 보안 설정 : root 비밀번호 설정
# mysql_secure_installation
-------------------------------------------------
- PASSWORD for the db root account
- Remove anonymous user
- Disallow root login remotely
- Remove test database adn access to it
- Reload privilege tables now
🔨 메세지 Queue (RabbitMQ서비스) 설치 @ Controller Node
: 모든 서비스의 메시지를 받아 스케줄링하고 해당 명령어 처리
# yum -y install rabbitmq-server
🟢 메세지 큐 서비스 실행 및 활성화
# systemctl enable rabbitmq-server.service
# systemctl start rabbitmq-server.service
# systemctl status rabbitmq-server.service
🟢 오픈스택 사용자 추가 (비밀번호 설정)
# rabbitmqctl add_user openstack rabbitmq[비밀번호]
Creating user "openstack" ...
🟢 오픈스택 사용자의 접근 권한 허가: 설정(configuration), 쓰기, 읽기
# rabbitmqctl set_permissions openstack ".*"".*"".*"
Setting permissions for user "openstack" in vhost "/"
🔨 Memcached 캐시 서비스 설치 @ Controller Node
: 인증 서비스 KEYSTONE의 토큰 캐시
🟢 memcached, python-memcached 설치
# yum -y install memcached python-memcached
🟢 memcached 서비스 시작 및 활성화
# vi /etc/sysconfig/memcached
------------------------------------
OPTIONS="-l 127.0.0.1,::1,192.168.1.100[컨트롤러 노드의 관리용 IP] "
🟢 memcached 서비스 시작 및 활성화
# systemctl enable memcached.service
# systemctl start memcached.service
💯 여기까지, 기본 설치 완료 💯
'자기발전소 > # Manually Install OpenStack' 카테고리의 다른 글
| Openstack Neutron on Centos (Rocky) 1 [Controller Node] (0) | 2020.08.22 |
|---|---|
| Openstack Nova on Centos (Rocky) 2 [Compute Node] (0) | 2020.08.21 |
| Openstack Nova on Centos (Rocky) 1 [Controller Node] (0) | 2020.08.21 |
| Openstack Glance on Centos (Rocky) (0) | 2020.08.21 |
| Openstack Keystone on Centos (Rocky) (0) | 2020.08.18 |


